Monday 30 November 2009


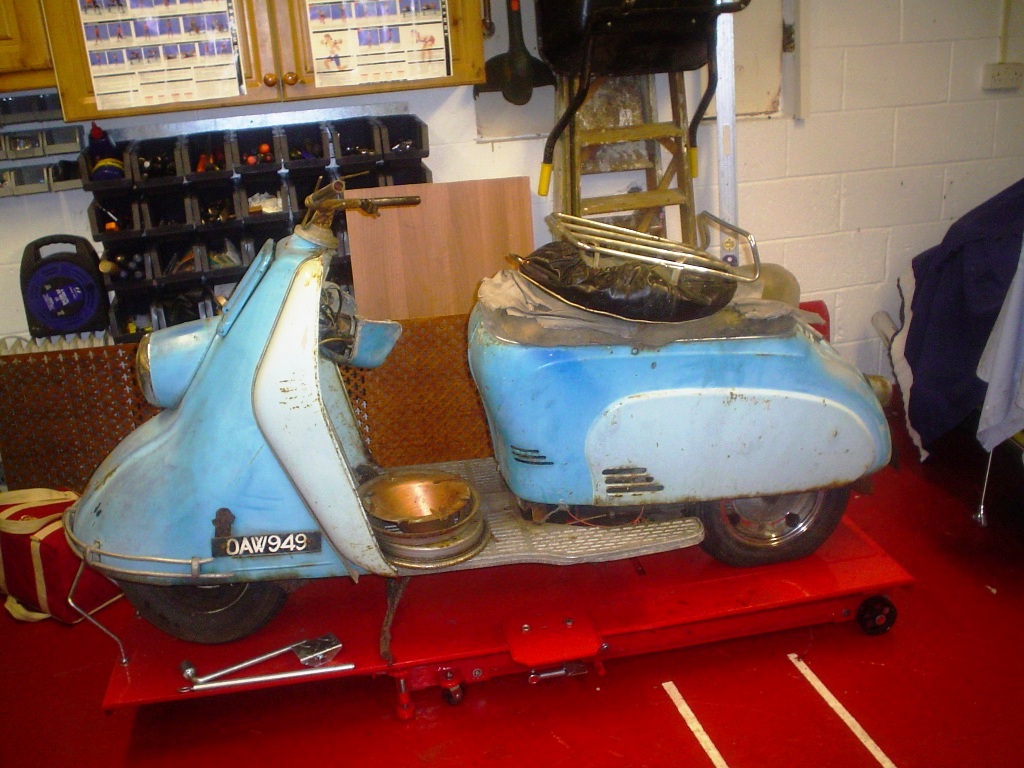
I completed the new wiring loom and temporarily fitted it into the frame, in went two brand new batteries and she turned over very nicely with a good healthy spark although she is not running yet. i will need to clean the petrol tank out next by using some fine shingle and give it a good shake so that the shingle removes any loose rust from the inside of the tank then i will give it a good wash out with petrol i dont think it has deteriorated enough to warrent the use of tank seal . i will check the setting on the carburetter, set the gap on the new spark plug and contact breaker points in preparation for the big start, The panels are coming along slowly still filling the dents layer by layer i have included a few pics of the panels. i will keep you all updated and thanks for looking in

Wednesday 18 November 2009


I have had all the panels sand blasted and primered ready for the spraying. Thought it would be wise to bolt them back onto the scooter to make sure nothing had been bent while at the sandblasters but everything seems ok. There are a few dents on the legshield and a bit of work to do the front bumper,also a couple of holes to the rear body were i will have to weld in a few pieces. The closest colour i could get to the original was an old british leyland rover colour which seems to be a very good match to the original pampas grey colour,which will look great with red piping between the leg shield and nose panel.

Friday 16 October 2009


The engine is finally back in its frame after almost two years, i have included some photographs which i took today. The original exhaust was beyomd repair so i have decided to use a secondhand exhaust from an A2 model which needed a small weld which i had done by a friend of mine, although not true to the restoration it will have to do as i cannot source an early AO exhaust as they are as rare as hens teeth. I wire brushed the newly welded exhaust and have given it three coats of silver heat resistent paint. the exhaust does not look pretty but you will only see the end of the tail pipes when the bodywork is in situ. I am now going to concentrate on making a new wireing loom and will keep you all updated

Thursday 15 October 2009


Just before i replaced the engine into the frame,i decided to check the dynastart brushes and oil seal, i am glad i did because the brushes were worn by two thirds so i replaced these with a new siba set (£15 from heinkel club uk) and the oil seal was also replaced another £2.50. So now the engine is back in place it looks as if things are starting to come togeather, All the new cables are in place and i am now inspecting the old wiring loom which i have decided to replace by making my own , the heinkel club wanted £70 for a new one so i ordered all the cable and connectors,sleeves etc which cost me only £15 so i will get on with this and let you know the outcome, i will update the pictures tonight.

Thursday 24 September 2009


I have now replaced the rear brake shoes with a brand new pair as the old pair were almost down to the metal,i have also put on the newly powder coated engine shrouds which look great. The pallas carburetter was extremely dirty and i have cleaned this thoroughly,there did not seem to be excessive wear to the jets but i will see how the engine test goes before i decide on a complete carb overhaul. I will sit the engine back into the frame this weekend and start getting the electrics fitted for the engine test keeping fingers crossed of course. i will let you know how this went in my next post


Thursday 10 September 2009

I have put back the push rods and valve springs and set the gaps according to the manual. while the engine is out i have taken off the clutch housing cover just to take a peek inside and check the overall condition of the drive chain and sprockets which all seem to be fine with very little wear. The clutch plates look they have plenty of life in them yet. I will have to replace the oil seal on the inside of the crankcase were the clutch spindal enters because the bottom has perished and has been torn away,i got a replacement from the heinkel club uk total cost £5. Before the clutch housing cover is replaced the marks on the gear change lever must correspond with the marks on the small gearchange sprocket if you dont do this at this stage you will have to take it all apart again. I also put on a brand new gasket for the cover with a very light smear of grease. and brand new nyloc nuts to hold the cover in place. Next job will be to check the brushes in the dynastart and also check the points ,i will keep you updated on this.

Wednesday 26 August 2009

The piston barrel and cylinder head have now been put back into place with new gaskets, the four cylinder head bolts tightened in diagonal sequence too torgue 21.6 lbs. I have decided to re-use the old valves and valve springs as they are in very good condition so have just grinded them in again.bolted on exhaust outlet and carburetor intake pipes. Next is to refit the the pushrods and rocker arms,i will keep you updated on this

Thursday 2 July 2009

I managed to get the old bush out of the connecting rod by using a hacksaw blade and splitting it out of the conrod being careful not to hacksaw into the conrod. i then replaced the bush with a new one which came without the two oil holes in it so i drilled them once the new bush was in place. After offering up the new gudgeon pin its seems its going to be a very tight fit into the new bush so i will have to sand the new bush down evenly with some wet and dry paper (may be should have checked this while the bush was out of the conrod i think it may have been easier to sand down), i then prepared the barrel to take the new piston by deglazing it with some wet and dry paper this will give the new compression rings and oil ring a chance to bed into the barrell wall.

Tuesday 26 May 2009


I now have a nice clean cylinder head cover, cylinder head, and cylinder . the picture on your left is before cleaning. On closer inspection of the valves and valve springs i have decided to completely renew these items as they are not expensive and it seems like a good time to do so. when these new valves arrive i will grind them into the head. As for the pistons rings i have removed these from the piston and inserted them into the cylinder to check for wear and the gap was three times larger than the minimum requirement so i have decided not only to replace the rings but to replace the whole piston using a standard 60mm mahl repacement which cost £25 from british heinkel club . There was also considerable wear to the connecting rod bush so i will also replace this so that everything is nice and tight. I will now have to try and get the old bush out which can sometimes be difficult

Saturday 28 February 2009

1956 Heinkel Tourist 103 AO Restoration


In 2008 i sold my beloved 1961 heinkel tourist 103 A1 scooter and in with the deal i acquired a very sad looking 1956 heinkel tourist 103 AO scooter with original registration document and some repair bills from the 60s.The scooter needed extensive restoration and had not been used since 1983, The deal also included a complete spare engine with a broken crank. In hindsight i was not really that bothered about selling my A1 because i did receive the same money i paid for the scooter 12 months earlier ,so the AO project cost me zilch. On collection day the buyer came down from the northwest of England to collect his A1 and to my surprise stuffed in the back of his very small car laying on its side and looking very sorry for itself was my 1956 heinkel tourist 103 AO Restoration project .(with the spare engine my i add). I just wondered how i was going to get it out of his car, as it was squeezed in very tightly but we managed to prise it out eventually, not without leaving a rather large oil slick in the back if his car (oops). After pushing my heinkel AO into my workshop i sat and looked at it and thought to myself were should i start on this near basket case of a scooter, she had already been partly dismantled as the speedo and clock housing was hanging down, the grips and cables had already been taken off and put into a box,the seat(what was left of it) and spare wheel rack were also dismantled. After taking off all the tinwear including front fender, legshield, rear engine cover and inspected the engine, everything looked complete although everthing was covered in surface rust. The exhaust looked to be the original one from 1956 and was completely beyond repair and full of holes, but i will put this to one side in case i need a pattern for a new replacement, i must point out that these early AO exhausts differed from the later A1 and A2 exhausts as they have two tailpipes welded together and a secondary metal heat shield built over the main silencer box to stop the rear tinwear getting a hotspot, but saying that the later A1 and A2 exhausts will fit these earlier models if you don't mind straying away from originality. I then removed wheels and then lifted her engine out. I am not sure of the condition of the engine although compression is their and she has a genuine 23,300 miles recorded on the speedometer. Next step was to gather all the items for re chroming which were the handlebars, headlight rim, spare wheel rack and three split rim wheels and shipped them off straight away to be re chromed at a cost of £400 including shipping. Next was to gather all the parts that i needed to send for sandblasting including frame, front forks, petrol tank, main stand, front and rear inner mudguards, engine cowlings, air filter box etc and then hurriedly get them over to the powder coaters before oxidisation set in. I decided on a cream colour for the powder coating and titanium silver on the stand and inner mudguards, foot brake etc. The eventual paint finish on the tinware when i have decided on the colour with be a traditional cellulose finish.
I decided to purchase a proper heinkel engine maintenance stand which i am finding much more practical as it allows you to rotate the whole engine while you work on it. I purchased this new from a guy on ebay germany at cost of about £120 including shipping. First i drained the engine oils and then removed the rocker cover, then i removed the cylinder head, rocker arms,and push rods. The barrell was removed to reveal the piston which looked in reasonable condition considering it has covered 26,000 miles with just a few areas around the compression rings showing evidence of escaping gases, the cause of this is possibly a case of worn compression rings. I then removed the valve springs and valves from the cylinder head, all the items i had removed i placed in a large container of degreaser for a few days to try and loosen some of the carbon and gunk from the cyclinder head ,piston and rocker cover , valves ect.
Powered By Blogger

Search This Blog

WELCOME TO MY BLOG ALL YOU FELLOW HEINKELERS

Thankyou for taking the time to look at my blog

Followers